The Most Common QR Code Mistakes and How to Avoid Them
QR codes have become one of the simplest ways to connect offline touchpoints with online actions. You see them in cafes, on billboards, in transit, on packaging, in documents, presentations, and ad campaigns. One quick scan can open a website, menu, sign-up form, payment page, phone contact, Wi-Fi access, or calendar event. That is why a QR code often feels almost too easy: generate it, drop it into a layout, and move on.
In practice, QR codes are technically sensitive visual elements. They depend on structure, contrast, size, file quality, placement surface, link accuracy, and real scanning conditions. A tiny mistake, such as an extra character in a URL, a code that is too small, a blurry JPG, or a decorative background, can make the code frustrating or completely unusable.
For a business, this is not a harmless technical detail. A broken QR code means lost traffic, a weaker campaign, fewer leads, fewer reviews, incomplete analytics, and a worse customer experience. Once someone has taken out a phone and tried to scan, there may not be a second attempt.
This guide is for anyone who wants QR codes to work professionally: founders, marketers, designers, event teams, local business owners, and teams that use QR codes in customer communication. Instead of only listing mistakes, we will explain why they happen, how they affect scanning, and what to do so the code performs reliably in real conditions.
Below you will find the key factors: image quality, color, file format, dynamic QR codes, testing, design, and analytics. If you need to create a code quickly for a website, menu, event, or contact card, you can use the FbFast QR code generator and test the result before publishing it.
The QR code does not work after scanning: what went wrong?
This is one of the most frustrating QR code failures because it appears after the user has already engaged: the camera reads the code, but the expected action never happens. The page may fail to open, return a 404, show a security warning, launch the wrong app, or send the user to outdated content. For the person scanning, it feels like a broken experience; for the brand, it damages trust at the first touchpoint.
Most of the time, the issue is not the QR pattern itself but the data encoded inside it. A URL may have been copied with a trailing space, without the https:// protocol, with a wrong parameter, or through a temporary redirect. Another common case is that a page was moved, deleted, or reorganized after the QR code had already been printed on flyers, packaging, or posters.
Short links and dynamic QR codes add another risk layer because they rely on an intermediary service. If that service goes down, changes its terms, blocks a link, or the browser treats the redirect as suspicious, the user may never reach the intended destination. The QR code may look perfectly normal, but the business goal still fails.
How do you prevent link-related QR mistakes?
Before generating a QR code, make sure the URL is correct, opens without authentication, and points to the exact page you need. Test it in a mobile browser, not only on a desktop, because most people scan QR codes from smartphones. If the page contains a form, payment flow, menu, or downloadable file, test not only the first page load but also the next action after the click-through.
Avoid temporary or questionable redirect services for important campaigns. For stable performance, use your own domain, a trusted platform, or a tool where you can control the destination link. If you need a QR code for a website, service page, or promotion, it is practical to create it with the website QR code generator and immediately check how it behaves after scanning.
For dynamic QR codes, schedule regular checks: right after creation, before printing, after publication, and periodically during the campaign. This matters most for offline materials that are hard to replace quickly, such as packaging, signs, banners, POS materials, catalogs, or printed invitations.
💡 Tip: Always open a QR code on several devices: a phone, a tablet, iPhone, and Android. Test scanning on Wi-Fi and mobile data, and make sure the landing page loads quickly on a mobile screen.
Low image quality: when a QR code becomes blurry or impossible to scan
A QR code is a visual object that a camera has to read. Unlike a plain text link, it leaves no room for guesswork: if module edges are blurred, lines merge, the image is compressed, or proportions are changed, the scanner may fail to recognize the matrix. This is especially important where the interaction must be quick: at a checkout, in a queue, at an event, near an entrance, in public transport, or outdoors.
Quality often breaks at the export stage. A code is saved too small and then stretched in a layout; pasted from a screenshot; exported as a lossy JPG; compressed by a messenger; or resized manually without preserving proportions. On screen, the damage can look minor, but in print the small details quickly become soft or distorted.
It is risky to judge the code only inside a digital mockup. What looks acceptable in Figma, Photoshop, Canva, or a PDF viewer may not scan well once printed on paper, cardboard, plastic, or a label. Printing adds physical variables: material, ink, lamination, size, lighting, and the distance to the camera.
How do you keep a QR code sharp?
For digital use, such as websites, email campaigns, presentations, and mobile pages, a high-resolution PNG is usually enough. PNG keeps edges crisp and avoids compression artifacts that can damage small QR modules. For print, choose SVG or PDF, because vector formats scale cleanly and let designers resize the code safely in the layout.
If the QR code will be printed at a small size, start with a high-quality source file and make a test print. Do not paste the code from a screenshot, do not send it through messengers that compress images, and do not treat it like a decorative bitmap. The safest workflow is to export the QR code from the generator in the right format and give that exact file to the designer or print shop.
Keep the aspect ratio intact as well: a QR code must remain square. Even slight horizontal or vertical stretching changes the geometry of the modules, and the camera no longer sees the structure it expects.
💡 Tip: The first rule is simple: do not edit a QR code in a graphics app as if it were a decorative image. Work with the original file, keep the square shape, and test the final medium, not only the mockup.
An overly complex structure: why a crowded QR code scans poorly
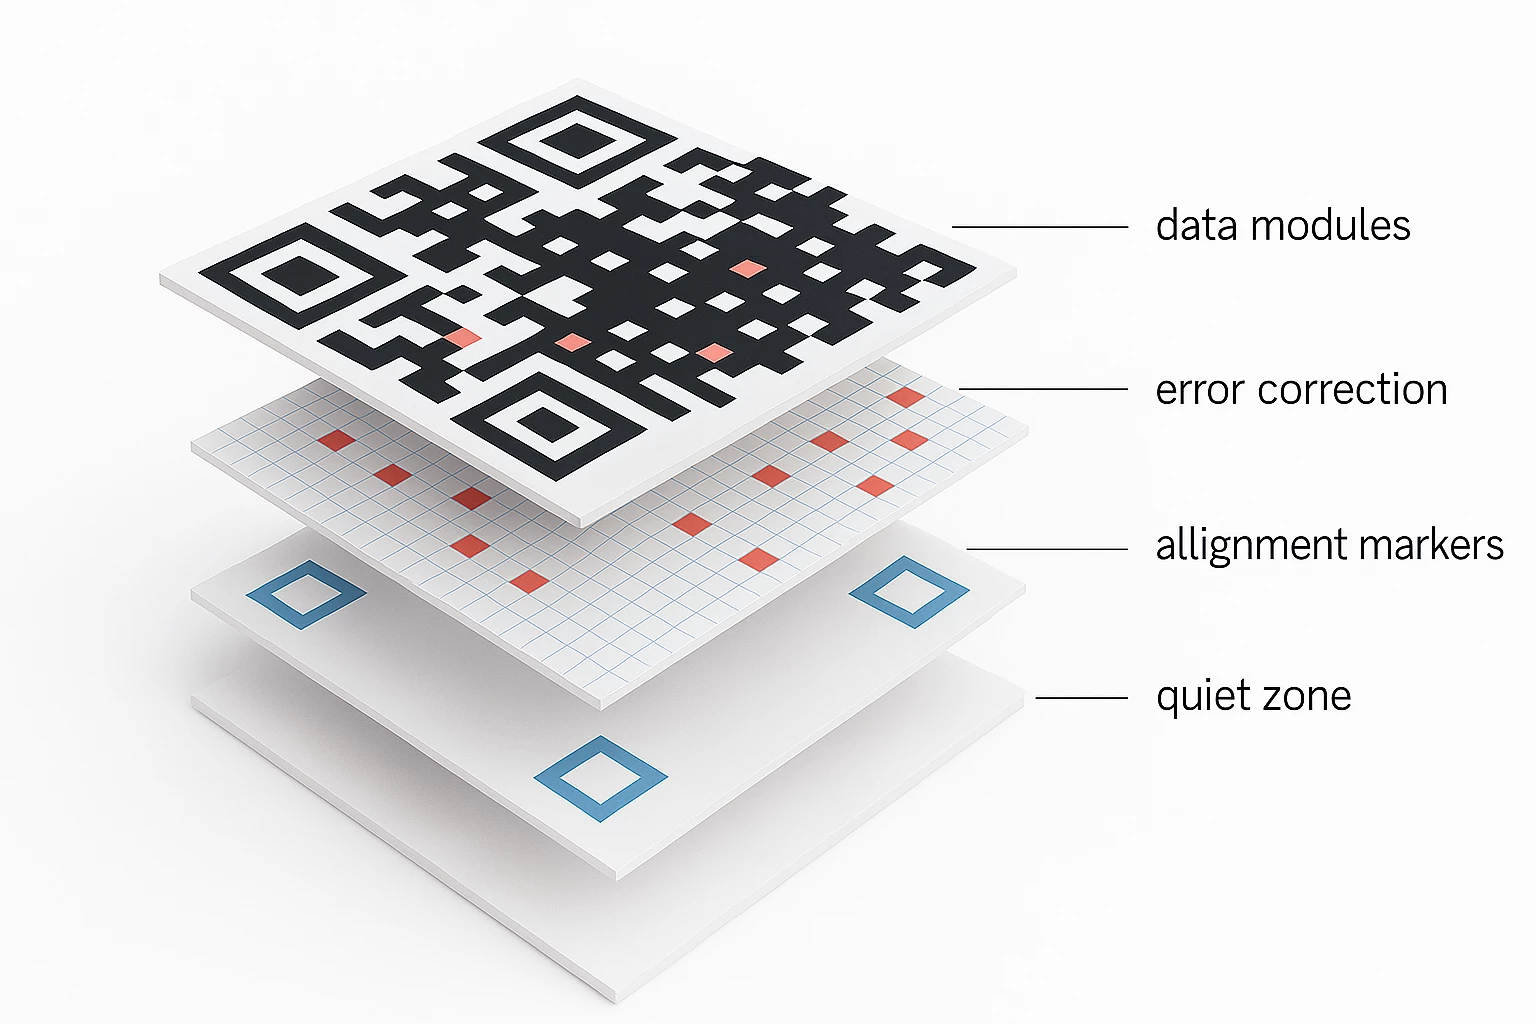
A QR code stores information through a matrix of modules, the small squares that form the pattern. The more data you try to encode, the more complex the structure becomes: there are more modules, they get smaller, and the whole code looks denser. For the scanner, that means more detail to identify; for the user, it often means more time spent adjusting distance and focus.
Beginners often try to squeeze too much into one QR code: a long URL with UTM parameters, a large text block, a full contact profile, instructions, an address, a service description, or several parameters at once. But a QR code should not replace a webpage. Its job is to move a person quickly and reliably to the next action: opening a page, menu, form, map, contact, or file.
An overloaded QR code is harder to scan, especially when it is printed small or placed on an imperfect surface. It may work on a large screen but perform poorly on a business card, package, sticker, badge, or flyer. The smaller the modules are, the more they are affected by blur, ink spread, lighting, distance, and camera quality.
How do you simplify a QR code?
The best answer is to encode only the information the user truly needs at the scan moment. If you have a long URL with parameters or need to change the destination after printing, consider a dynamic QR code. It keeps the visible QR pattern shorter while preserving the ability to edit the destination, collect statistics, or redirect users to updated content.
Avoid embedding large text blocks unless there is a strong reason. If the user needs detailed information, create a proper landing page with a headline, explanation, buttons, form, or contact details. In that scenario, the QR code becomes a fast entry point, not the container for everything.
For print, choose a size with enough margin for real scanning. There is no universal size rule for every use case because it depends on scan distance, code density, and the material, but small printed items should not push the QR code to the limit. If the code looks visually noisy or is made of very tiny modules, shorten the data, increase the size, or change the format of the interaction.
💡 Tip: Ask yourself: "What is the minimum action the user needs after scanning?" If the answer is to visit a page, do not put everything into the QR code. Give users a short path to a strong landing page.
Color and contrast problems: when style gets in the way of scanning
Modern QR codes are increasingly treated as part of branded design. They appear in presentations, menus, packaging, flyers, banners, business cards, posters, and promotional materials. The desire to make a code match the brand is understandable: a black square on a white background does not always fit the final design. But this is where one of the biggest mistakes happens: design starts working against function.
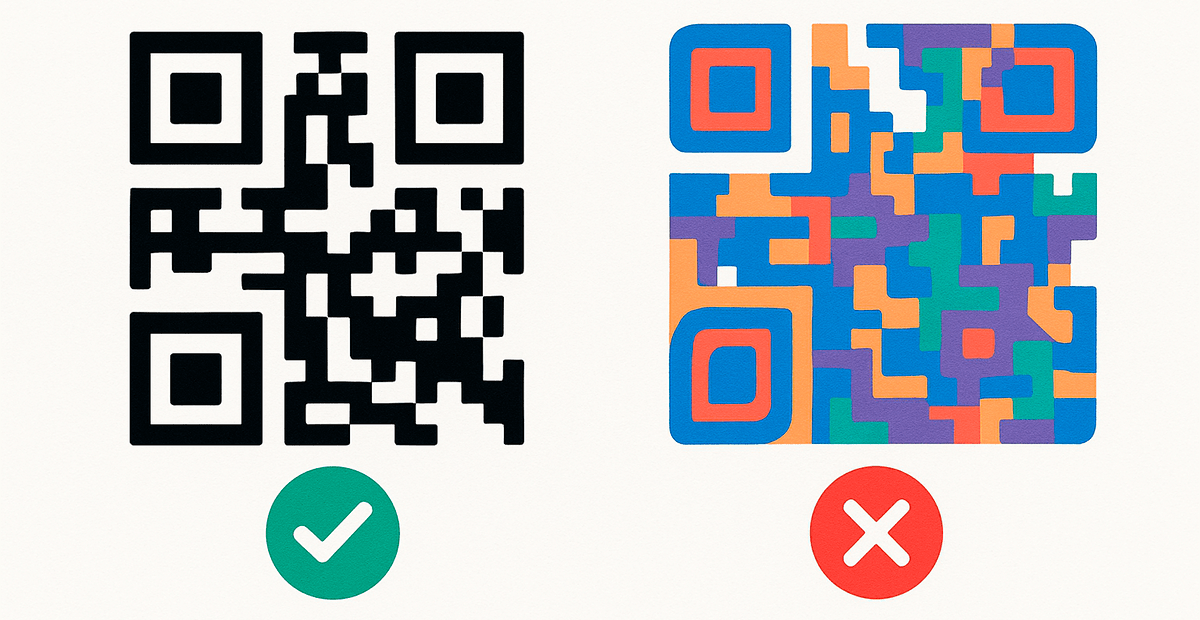
QR codes are read through the contrast between dark modules and a light background. The camera needs to identify boundaries, find orientation markers, and recognize the matrix structure quickly. If the contrast is weak, the background is too saturated, the modules are too light, or there is texture over the code, the algorithm may not understand where the background ends and the code begins.
The most common trouble comes from light module colors: yellow, beige, pink, pale gray, and pastel tones. These QR codes may look polished in a mockup but fail on screens with different brightness levels, in print, or under poor lighting. Another frequent mistake is placing the code directly on a photo, gradient, texture, or colored pattern without a clean light backing.
Context matters too. A QR code on a website is scanned differently from one on a billboard, package, or menu in a dim room. What scans perfectly on a designer's laptop may not work from a customer's phone in the real environment.
How do you choose colors for a QR code?
The safest option is a dark QR code on a light, even background. It does not have to be black on white, but the contrast must remain strong. If you use a brand color, choose a dark, saturated shade for the modules and a very light backing for the background.
Do not place a QR code directly on a photo or gradient. If the design needs a complex background, create a separate light panel for the code, leave enough padding, and test scanning in conditions close to real use. In QR code design, the principle is straightforward: aesthetics matter, but function comes first.
If the brand requires a more distinctive look, prepare two versions: the main branded version and a fallback classic version. It is also worth reviewing how to create a customized QR code without hurting scan reliability: logos, colors, and frames can be used safely when the core technical rules are respected.
💡 Tip: Check a colored QR code not only on screen but also in print. Change the lighting, distance, and devices. If the code needs a perfect angle or several attempts, simplify the design.
Inverted colors: why a light QR code on a dark background is risky
An inverted QR code uses light modules on a dark or colored background. In a design layout, it can look striking, especially on dark packaging, posters, business cards, screens, or night-mode interfaces. From a scanning perspective, however, it is not the most dependable choice because many cameras and built-in scanners work best with the standard model: dark code on a light background.
The issue is not only the color itself, but also how the camera algorithm searches for structure. A QR code has orientation elements, edges, modules, and a quiet zone. When light and dark areas are swapped, some scanners may interpret the background and code incorrectly. The result is inconsistent behavior: one phone opens it immediately, another needs several attempts, and a third may not read it at all.
Inversion is especially risky for flows where speed and accuracy matter: payments, registration, authentication, tickets, safety instructions, menu access, or service pages. In these scenarios, the user should not have to figure out which angle works or why the camera cannot see the code.
Inverted designs also perform worse in low light, on screens with automatic brightness, and in print on materials that absorb ink or create glare. Even if a test passes on your own phone, that does not guarantee stable performance for a broader audience.
How do you avoid problems with inversion?
For critical use cases, use the standard approach: dark code on a light background. If the overall design is dark, create a light field or negative frame inside it and place the classic QR code there. This keeps the visual style while preserving the recognition pattern.
If an inverted design is still required, test it more thoroughly than usual: across different smartphone models, scanning apps, low and bright light, multiple distances, and after printing. If the code does not open on the first attempt, that is already a strong reason to return to a safer version.
💡 Tip: A QR code can be stylish, but it should not become a puzzle for the camera. If the design looks better but scans worse, choose a compromise rather than losing traffic and user trust.
No quiet zone: why you should never squeeze a QR code into a layout
A QR code needs more than a clear image. It also needs open space around it: the quiet zone. This empty area separates the code from nearby design elements such as text, lines, icons, frames, photos, logos, or the edge of the page. It is what helps the camera understand where the QR code starts and ends.
Without a quiet zone, the scanner sees not a clean matrix but a cluster of visual objects merging together. To a person, the layout may look neat: the code is compact, with a caption, arrow, or decorative border nearby. To the recognition algorithm, those surrounding elements become noise and can interfere with boundary detection.
This mistake is common in flyers, business cards, badges, stickers, packaging, and menus where every bit of space feels valuable. A designer saves space by pushing the QR code against text or the edge of the layout, and after printing the code scans inconsistently. The space saved on the page turns into lost functionality.
How do you leave the quiet zone correctly?
Leave a clear margin of at least several modules on every side of the QR code. A practical rule is to keep active visual elements away from the code: text, frames, icons, lines, patterns, or fragments of images. The background in this area should be light, even, and free from decorative noise.
Do not place the QR code flush against the edge of the layout. In print, this matters even more because trimming, shifting, or lamination can remove part of the margin. If you use a decorative frame, make sure it does not overlap the code or break the quiet zone. A frame can attract attention, but it should not become part of the matrix.
The best practical check is to view the PDF at 100%, print a test sample, and scan it with a regular phone. If the code only works when the camera is positioned very precisely or extremely close, the missing margin may be the problem.
💡 Tip: Do not treat the white space around a QR code as wasted space. It is part of how the code works. Without a quiet zone, even a high-quality QR code can become unreliable.
QR codes on unsuitable surfaces: when shape matters
Not every problem starts during generation or design. Sometimes a QR code is created correctly, saved in a high-quality format, and tested on screen, but once it is placed on a real object it starts scanning poorly. The reason is the surface: curved, glossy, textured, transparent, metallic, or anything that distorts the image geometry.
The clearest example is a bottle, tube, paper cup, can, cosmetic container, or any other curved package. A QR code must remain a square matrix, while the curve changes its proportions for the camera. If part of the code wraps around the bend, the scanner no longer sees a flat structure; it sees a distorted object.
Glare is another common issue. Glossy film, varnish, metal, glass, or shiny plastic can create bright reflections that cover parts of the modules. In real life, users cannot always change the lighting or find the perfect angle. If the QR code is on packaging, a receipt, a table, or a sign, it should work without extra effort.
For a business, the impact is practical. If a QR code on a product does not scan, you lose the chance to send someone to instructions, reviews, a loyalty program, warranty registration, or a repeat-purchase page. If the QR code is needed for a service action, the user may simply be unable to complete it.
How do you choose a safe place for a QR code?
If the QR code must be placed on a curved surface, increase its size and choose the area with the least distortion. On bottles and cups, avoid zones near the edges where curvature is strongest. If possible, place the code on a flat label, insert, box, receipt, or separate card where the user can point the camera comfortably.
For glossy and metallic materials, test the code under real lighting. Matte lamination, low-reflection paper, or a separate light backing often works better than dramatic shine. If the surface is difficult, add a backup QR code in a more convenient place or duplicate the destination as a short text link.
💡 Tip: The goal is not simply to place a QR code in a layout; it is to make it readable in the real environment. If the surface is questionable, choose the more conservative and stable option.
The wrong file format: why not every image works for a QR code
After creating a QR code, you need to save it for later use: in designs, print materials, posts, presentations, documents, or email campaigns. This is where a mistake often appears quietly: the chosen file format reduces quality, softens the edges, or makes scaling unsafe.
The most common problem is using JPG or JPEG. This format is useful for photos, but not for QR codes, where sharp boundaries between modules are essential. JPG uses lossy compression, which can add artifacts, gray transitions, and blur around the edges. To the human eye, these defects may seem minor; to a scanner, they can be enough to cause failure.
Another frequent scenario is treating the QR code like an ordinary image in a layout and then resizing, compressing, cropping, or deforming it. It is especially risky to send the code through messengers or services that automatically compress files. By the time the code reaches the final layout, it may no longer match the original generated version.
Which QR code format should you choose?
For digital use, PNG is usually the best option: it preserves sharpness and avoids losses that are critical for scanning. For print, large-format materials, packaging, or layouts where the QR code must be scaled, use SVG or PDF. Vector formats let you enlarge or reduce the code without losing quality.
Avoid JPG, especially if the code will be printed or displayed at a small size. Also keep the QR code proportions unchanged: the aspect ratio must remain 1:1. If a designer or print shop asks for the file, send the original SVG or a high-quality PNG and clearly note that the code must not be compressed, cropped, or transformed.
If you create several versions for different channels, such as a website, poster, and package, export separate files for each scenario instead of reusing one small PNG everywhere.
💡 Tip: Send the QR code to a designer or print shop with a short technical note: keep it square, do not compress it, do not crop it, preserve the quiet zone, and test scanning after exporting the final PDF.
Skipping pre-launch testing: a small mistake with large consequences
Lack of testing is one of the most ordinary and dangerous QR code mistakes. You can generate the code correctly, save it in the right format, choose strong contrast, and place it carefully in the layout. But if you do not verify the final result before publishing or printing, all of that work may not matter.
In practice, testing reveals problems that are invisible while editing. A QR code may lead to a 404 page because of one extra character in the URL; the page may open on desktop but break on mobile; the code may scan on Android but fail on iPhone; print may reduce contrast; or the redirect may be too slow.
These mistakes become especially expensive in printed campaigns. Once a QR code is already on thousands of flyers, packages, tickets, stickers, or posters, fixing the issue quickly is almost impossible. That is why testing should not be a formality; it should be a required launch step.
How should you test a QR code?
Test the QR code on several device types: iPhones, Android phones, tablets, and models with different camera quality. Use more than one scanning method: the built-in camera, a third-party scanner, and different browsers. This helps catch issues that may affect only part of your audience.
If the QR code will be printed, make a test print on the actual material. Scanning from a screen does not replace testing on paper, plastic, cardboard, a label, or a banner. Check the code at the size it will be used and in conditions close to reality: daylight, artificial light, typical distance, and a natural viewing angle.
Test not only whether the code scans, but also the full user journey after scanning. The page should load quickly, work well on mobile devices, avoid security warnings, not require unnecessary steps, and lead to a clear next action. If the QR code leads to a form, payment, or registration, complete that scenario end to end.
💡 Tip: Switch into user mode: scan the QR code as if you were seeing it for the first time. If you need to adjust the angle, move the phone closer, or wait too long, some users will abandon the action.
Unmonitored dynamic QR codes: when the link stops working
Dynamic QR codes are useful because they let you change the destination without reissuing the code, add analytics, update campaigns, test different pages, and fix mistakes even after printing. For a business, this is a major advantage, especially when the QR code appears on materials that are hard to replace quickly.
That flexibility has a tradeoff. Unlike a static QR code, a dynamic one often stores not the final address but an intermediary link that redirects users through the service's server. If that server is unavailable, the account is blocked, the plan expires, the domain changes, or the redirect is configured incorrectly, the QR code may stop working even though it looks exactly the same.
Trust in the intermediary link is another risk. If you use an obscure shortener or a service with a poor reputation, browsers, antivirus tools, or corporate networks may show warnings or block the visit. In commercial campaigns, that directly affects conversion: a user may see the warning and close the page.
How do you use dynamic QR codes safely?
Create dynamic QR codes through reliable platforms where you control the link, can edit the destination, and can review statistics. For these tasks, you can use FbFast, especially when QR codes are part of a marketing campaign, service flow, or recurring customer communication.
Check regularly that the destination page opens, the redirect works correctly, the protocol has not changed, no security warnings appear, and the content after the scan is still current. For larger campaigns, using your own redirect domain can increase user trust and give you better control over traffic. It is also useful to plan in advance how you will track QR code performance and store analytics data.
If a QR code has a long lifecycle, for example on packaging, instructions, signage, menus, or documentation, treat it as part of your digital infrastructure. It is not enough to create it once. You need to maintain it: check links, update pages, manage access, and archive important statistics.
💡 Tip: A dynamic QR code is not a "create it and forget it" asset. If it leads to an important business flow, add regular checks to your process just as you monitor websites, lead forms, or ad campaigns.
Excessive customization: when design breaks the QR code
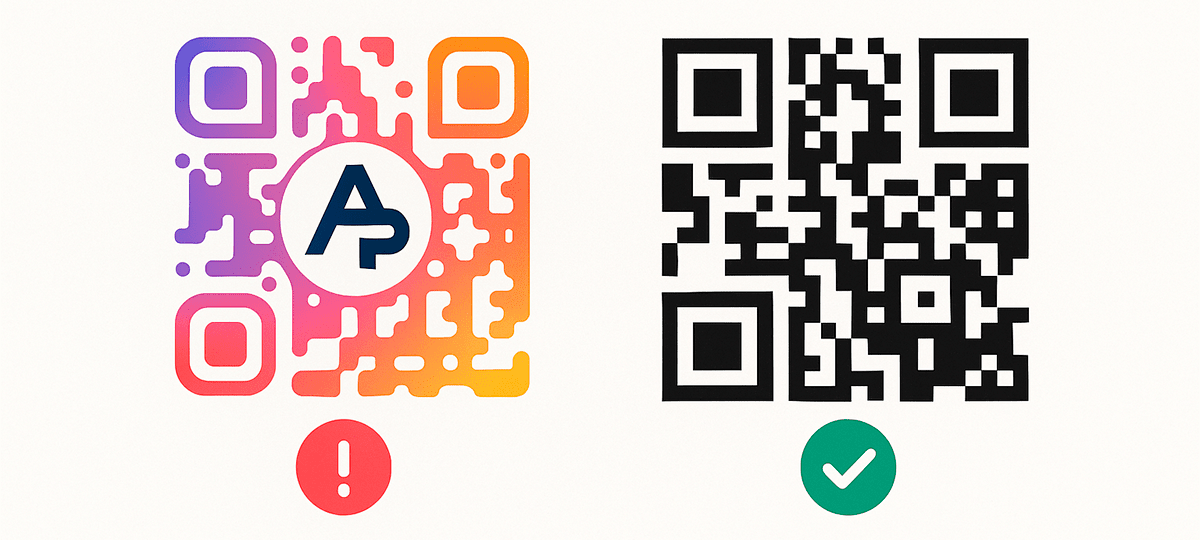
Modern QR code generators make it easy to adapt a code to a brand: change colors, add a logo, round elements, use a frame, add a caption, or place it on a decorative background. That is useful because the QR code stops feeling like a random black square and fits better into the visual identity. But it is important to remember that a QR code is not just a graphic element; it is a functional matrix.
Too much customization can damage the very features that make the QR code readable. If the logo is too large and covers important modules, the scanner may lose part of the data. If you alter the finder patterns, the squares in the corners that help the camera orient itself, the algorithm may struggle to locate the structure. If you add background texture, transparency, or weak contrast, the code may work only in perfect conditions.
QR codes do include error correction, which helps recover some information when the code is damaged or partially covered. But that does not mean you can freely cover a large part of the code with a logo or decorative graphics. Error correction is a safety margin, not permission for aggressive redesign.
How do you customize a QR code without losing scan reliability?
If you add a logo, place it in the center and keep it moderate in size. In practice, it is safer to stay conservative so the logo does not cover critical areas. Give the logo a clean backing and retest the QR code after every noticeable design change.
Do not modify key orientation elements until they no longer look like clear squares. Use rounded corners, decorative frames, shadows, and backgrounds carefully. If customization makes the code prettier but forces users to scan it two or three times, it is already hurting the result.
The best strategy is a balance between brand and engineering. If you need a stronger visual style, read the detailed guide on how to create a personalized QR code, and keep a backup technical version for scenarios where scanning must be as reliable as possible.
💡 Tip: Good QR design is not the one that stands out the most; it is the one that works consistently. With QR codes, effectiveness means fast scanning on different devices, in different lighting, without extra instructions for the user.
Conclusion: a QR code works well only when the whole interaction is planned
QR codes look simple, but their effectiveness depends on many details. What you encode matters, but so do the way the code looks, the format it is saved in, where it is placed, its size, the strength of its contrast, whether the quiet zone is intact, and whether it has been tested before launch.
Most mistakes look minor: a slightly lighter color, JPG instead of PNG, no free margin, an oversized logo, an unchecked short link, or a code printed on a glossy surface. For the user, the result is the same: the QR code does not open or works unpredictably. For the business, that means lost visits, leads, payments, reviews, registrations, or valuable analytics.
If you use QR codes in advertising, sales, service, events, menus, documents, or packaging, treat them as part of the customer's digital journey. A QR code should not merely exist in the layout; it should lead the person to a clear, fast, useful action. That requires checking the link, preparing a high-quality file, testing the design, and making sure the page after the scan actually meets user expectations.
A strong QR code is the one that does not draw attention to problems because it simply works. It is easy to notice, easy to scan, and easy to use. That quiet reliability is what separates a professional QR setup from a decorative afterthought.
To avoid technical mistakes at the start, create your QR code in the FbFast generator, test it on several devices, and only then add it to a printed or digital layout. You can also find detailed answers to common questions in our QR code FAQ.